 What's New
Dell™ OpenManage™ Server Update Utility 1.5
Other Documents You Might Need
Dell™ OpenManage™ Server Update Utility (SUU) is a CD-based application for identifying and applying updates to your system. You can use SUU to update your Dell PowerEdge™ system or to view the updates available for any system supported by SUU.
SUU compares the versions of components currently installed on your system with update components packaged on the Dell PowerEdge Server Update Utility CD. SUU then displays a comparison report of the versions and provides the option of updating the components.

|
NOTE: Only users with administrator (Microsoft® Windows®) or root (Linux) privileges can perform updates with SUU. |
The following are the new features introduced in SUU 1.5:
Repository is a database on the Dell PowerEdge Server Update Utility CD that contains the updated Basic Input/Output System (BIOS), firmware, and driver components for Dell PowerEdge systems. The Repository organizes these components into sets of updates for each supported system that, when applied, updates at one time all system components that require updates. Alternately, you can browse the Repository for updatable systems and components without running the update application. You can access the Repository for Windows systems on the Dell PowerEdge Server Update Utility CD for Windows and the Repository for Linux systems on the Dell PowerEdge Server Update Utility CD for Linux.
Comparison is a mechanism that SUU uses to determine the currently installed version of each component on a system. SUU then compares this version information with versions of the same component, for the same system in the Repository. For example, the components currently installed on a PowerEdge 4600 are compared with the Repository versions available for PowerEdge 4600 (see Figure 1-7).
Dell Update Packages are software utilities provided by Dell to update specific software components on your Dell system.
Bundle is a set of Dell Update Packages.
Prerequisite is a minimum version requirement of components and dependencies that a system must meet before any updates can be performed.
Inventory is a list of components, such as the BIOS versions, firmware, and drivers installed on your system.
Upgrade is an operation by which SUU applies a newer version of a component from the Repository. An upgrade begins when the user clicks the Upgrade button. The Upgrade button is enabled only when SUU finds Repository version components newer than the versions of components installed on the system.
Downgrade is an operation by which SUU downgrades the version of a component currently installed on the system to the older version of that component present in the Repository. The Enable Downgrade check box is enabled only when the SUU finds versions of components installed on the system that are newer than the Repository version components. Downgrade is a one-time operation.
Update is an operation that can include an upgrade or a downgrade. For example, you perform an update if you click the Upgrade button and apply a newer version of a component from the Repository. You can also select the Enable Downgrade check box and downgrade from a newer version in your system to the Repository version. You can also perform an update by selecting the Enable System Set Update check box and clicking the Update button. For more information about the System Set Update feature, see the "Upgrading and Downgrading Components in a Single Session" section.
Table 1-1 lists the icons that indicate the update status for a component in the Comparison Report.
Table 1-1. Icons and Update Status
Besides this guide, you can find the following guides either on the Dell Support website at support.dell.com or on the Dell PowerEdge Documentation CD:
The readme files for SUU and Dell Update Packages ship on the Dell PowerEdge Server Update Utility CD. These readme files contain the latest information about SUU and Dell Update Packages in addition to information about known issues.
The DellSoftwareBundleReport.html file in the Repository directory contains details about the contents of the Repository in a readable format. This is an HTML file that you can use as a quick reference for information about supported platforms, packages, bundles, and other details.
SUU is supported on many PowerEdge systems running the following versions of the Windows or Linux operating systems:
For detailed information about the various PowerEdge systems and operating systems that SUU is supported on, see the Dell PowerEdge Software Support Matrix. This guide is available on the Dell Support website at support.dell.com or on the Dell PowerEdge Documentation CD.
SUU runs from both a Graphical User Interface (GUI) and a Command Line Interface (CLI).
From the GUI, you can do the following:
From the CLI, you can run commands for performing comparisons and updates, and view the update progress. For more information about using the CLI, see the "Using the CLI" section.
In the GUI, you can start with a comparison and proceed to an upgrade, downgrade, or an update, or you can directly browse the Repository.
To start the GUI, insert the Dell PowerEdge Server Update Utility CD into the CD drive. SUU launches automatically and the GUI appears.
|
|
NOTE: SUU is delivered on separate CDs for Microsoft Windows and Linux. |
If SUU does not launch automatically, navigate to the Dell PowerEdge Server Update Utility CD root directory and launch suulauncher.exe (for Windows systems) or type suu -g (for both Windows and Linux systems) in a command window.
|
|
NOTE: On the Red Hat Enterprise Linux 5 operating system, CDs are auto-mounted with the -noexec mount option. This option does not allow you to use the autorun feature or run any executable from the CD. You need to manually mount the CD-ROM and then run executables. |
When you start SUU, SUU performs a prerequisites check. In the prerequisites check, SUU tries to perform an update and scans your system to determine if a hardware or software update is required. When the scan is complete, SUU displays the list of components whose prerequisite conditions are not met. The list of components may comprise hardware components, the Dell OpenManage component (software component), or hardware and software components.
If the components in your system meet the prerequisite conditions, SUU does not display the prerequisite failure messages. SUU displays the Comparison Report instead.
If the list of components for whom the prerequisites failed, comprises the Dell OpenManage component (software component), SUU displays a software prerequisite failure message as shown in Figure 1-2.
Figure 1-1. Software Prerequisite Failure Message
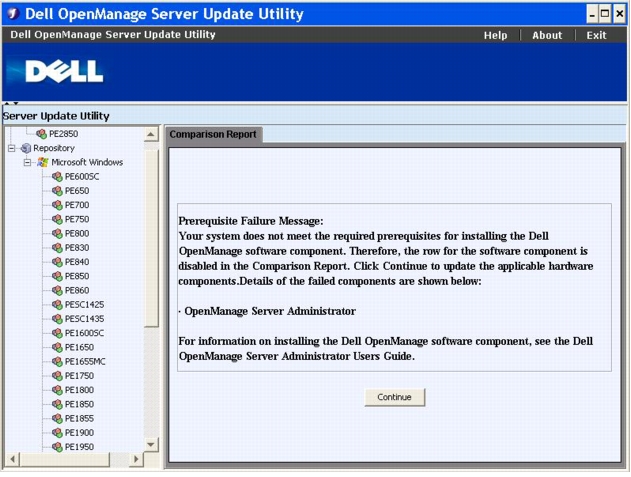
You need to install the Dell OpenManage component before proceeding with the software upgrade. To install the Dell OpenManage component, see the Dell OpenManage Server Administrator User's Guide. This guide is available on the Dell Support website at support.dell.com.
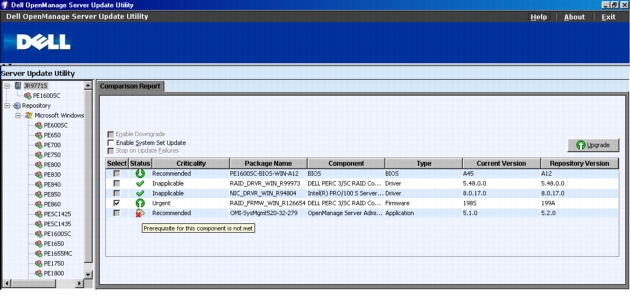
You can also click Continue to proceed with the update of hardware components, if applicable. If you click Continue, the row for the Dell OpenManage component is disabled in the Comparison Report as shown in Figure 1-2.
Figure 1-2. Dell OpenManage Component Disabled
If the list of components for whom the prerequisites failed, comprises hardware components, SUU displays a message as shown in Figure 1-3.
Figure 1-3. Hardware Prerequisite Failure Message
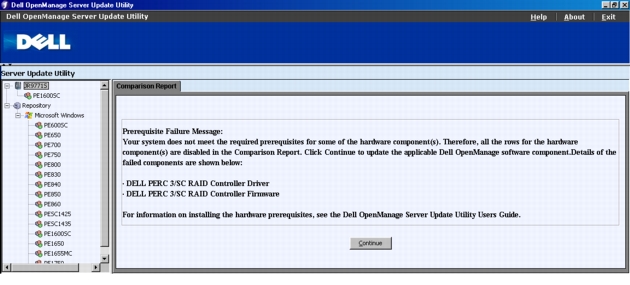
You must install these prerequisites before proceeding with the upgrade, downgrade, or update. You can also click Continue to proceed with the upgrade of the Dell OpenManage component, if applicable. To install the hardware prerequisites, perform the following steps:
|
|
NOTE: Set the boot order in your system BIOS such that the CD drive is placed ahead of the system hard drive. |
|
|
NOTE: An additional reboot may be required to complete the prerequisite update. Do not remove the CD until the information on the screen instructs you to do so. |
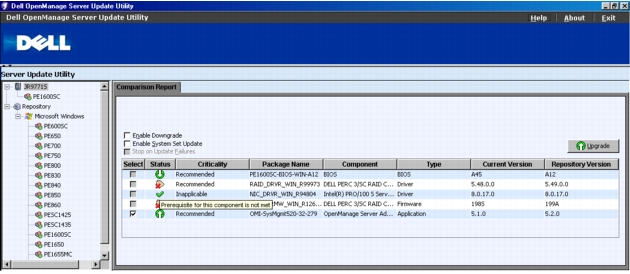
If you click Continue, all the rows for the hardware components are disabled in the Comparison Report. If the Dell OpenManage component requires an upgrade, the corresponding row is enabled in the Comparison Report as shown in Figure 1-4. You can proceed to upgrade the Dell OpenManage component.
Figure 1-4. Hardware Components Disabled
If the list of components for whom the prerequisites failed, comprises the Dell OpenManage component (software component) and the hardware components, SUU displays a prerequisite failure message as shown in Figure 1-5.
Figure 1-5. Software and Hardware Prerequisite Failure Message
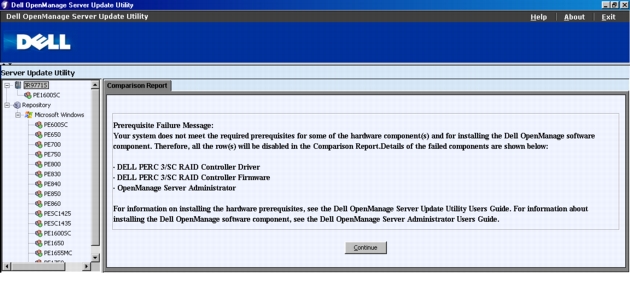
You cannot proceed with any hardware or software upgrades without installing the Dell OpenManage component or the hardware prerequisites. To install the Dell OpenManage component, see the Dell OpenManage Server Administrator User's Guide. This guide is available on the Dell Support website at support.dell.com. To install the hardware prerequisites, perform the steps in the "Hardware Prerequisites Failure" section.
You can click Continue to view the Comparison Report as shown in Figure 1-6. All the rows in the Comparison Report are disabled as both, the hardware and software components, failed to meet the prerequisite conditions.
Figure 1-6. Hardware and Software Components Disabled
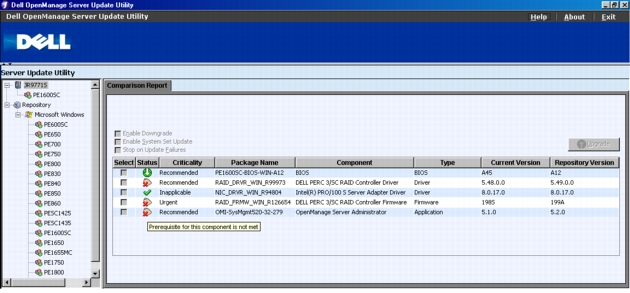
When you perform an upgrade, downgrade, or update, SUU copies all the update packages into a local directory on the system. The directory is <%systemdrive%>:\dell\suu in Microsoft Windows and /var/log/dell/suu in Linux. You can select the packages you want to upgrade. You can also downgrade newer versions of components on your system to the corresponding component version contained in the Server Update Utility CD. For more information about downgrading components, see the "Downgrading Components" section.

|
NOTICE: Do not remove the Dell PowerEdge Server Update Utility CD from the CD drive when running SUU. |
|
|
NOTE: The Dell PowerEdge Server Update Utility CD contains the OpenIPMI driver for Linux. |
SUU compares the components installed on your system with the component versions available in the Repository and displays the results in a Comparison Report. To view the Comparison Report, click your system's host name displayed in the left window directory tree.
|
|
NOTE: If your system's host name does not appear in the tree, either you do not have the correct user privileges, or SUU does not support your system. However, you can still browse the Repository. |
The Criticality column in the Comparison Report denotes the importance of applying the update. There are four levels of criticality: Urgent, Recommended, Optional, and Inapplicable. These levels are described in Table 1-2.
For every component on your system that is current with the version in the SUU Repository, SUU displays a green checkmark icon  .
For system components that are newer than the Repository version components, SUU enables the Enable Downgrade check box. For information on downgrading components, see the "Downgrading Components" section. Select the Enable Downgrade check box and click the Downgrade button to downgrade these system components to the Repository versions.
|
|
NOTE: The Enable Downgrade check box is enabled only if there is a component on the system that is newer than the Repository version component. |
SUU displays the inapplicable icon if the component version on your system equals the Repository version. In that case, the update is not applicable on your system.
If upgrade components are available, SUU enables the Upgrade button on the upper right corner of the Comparison Report (see Figure 1-7). For information on upgrading components, see the "Upgrading Components" section.
|
|
NOTE: You cannot use SUU to update any firmware or device driver installed on your system that does not match a comparable Repository component. You must manually update components installed on your system that do not compare with the Repository. |
If the Upgrade, Downgrade, or Update button is disabled, one of the following may apply:
|
|
NOTE: If your system shows the same package name for more than one component in the Comparison Report and these components require an Upgrade, it means that a single execution of the package is sufficient to update all the components. Thus, in the GUI, when you select/deselect one component using the check box, all other components that have the same package name are selected/deselected by default. |
Figure 1-7. SUU Comparison Report
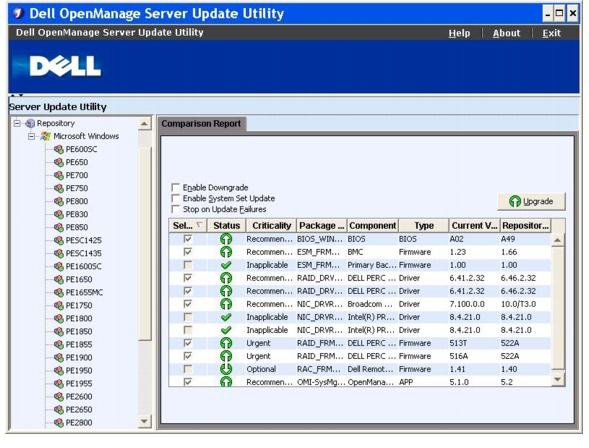
In this figure, the firmware, driver, and the Dell OpenManage components have been selected for an upgrade as the Repository versions are newer than the current versions installed on the system.
One of the firmware components (Dell Remote Access Controller 4/I Firmware) is recommended for a downgrade as the currently installed version is newer than the version in the Repository.
To upgrade components from the Repository, perform the following steps:
Click Yes to continue or No to cancel.
Figure 1-8. Upgrade Confirmation
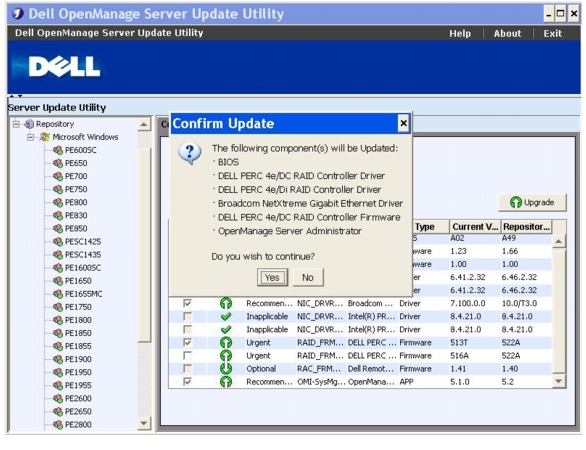
While upgrading the components, SUU displays a progress report as shown in Figure 1-9.
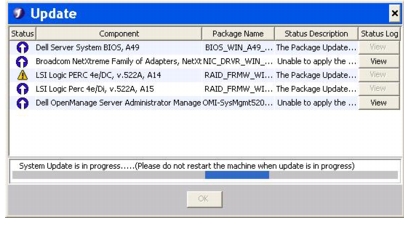
The status of the upgrade is reflected in the Comparison Report.
To downgrade components from the Repository, perform the following steps:
SUU disables the Enable System Set Update check box and enables only those components that are newer than the Repository version components and can be downgraded as shown in Figure 1-10. This is an automatic process and you cannot select/deselect individual packages.

While downgrading the components, SUU displays a progress report.
The status of the downgrade is reflected in the Comparison Report.
When the upgrade/downgrade/update completes, you may get a message instructing you to reboot the system to complete the upgrade/downgrade/update. If so, leave the Dell PowerEdge Server Update Utility CD in the CD drive during the reboot. When you upgrade/downgrade/update the BIOS, you must reboot immediately. SUU does not allow you to continue until you complete a reboot.
|
|
NOTE: If you must reboot, log in using the same user account or user privileges that you used during the previous boot. |
After you log in to the operating system, open a command window and type suu -g (for both Windows and Linux systems), or suulauncher.exe (for Windows systems) to restart the SUU GUI.
You can run SUU from a particular network location and update components on multiple systems. This feature is called the network share support feature.
You must be connected to the network to use the network share support feature.
To run SUU from a network location, perform the following steps:
In SUU 1.5, you can use the network share support feature to update NIC drivers.
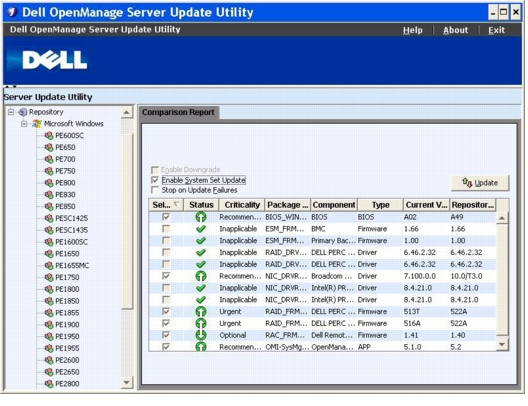
In earlier versions of SUU, NIC drivers were disabled while running SUU from the network. However, in SUU 1.5, NIC drivers are enabled in the Comparison Report and you can update NIC drivers when running SUU from a network location as shown in Figure 1-11.
Figure 1-11. Rows for the NIC Drivers Enabled in the Comparison Report
If you click Yes, SUU displays the Update dialog box that shows the progress of the update/upgrade/downgrade.
The updates are reflected in the Comparison Report.
|
|
NOTE: Running multiple instances of SUU from a network location, creates multiple copies of Java Runtime Environment (JRE) in your system. |
|
|
NOTE: If you cannot update components when running SUU from a network location, try running SUU on your system. If you can run SUU successfully on your system, it indicates a problem with the network connection. |
Using SUU, you can upgrade and downgrade components at the same time using the System Set Update feature. This saves you the time and effort of upgrading or downgrading components one at a time.
To upgrade and downgrade components at the same time, perform the following steps:
Figure 1-12. Enable Downgrade Check Box Disabled
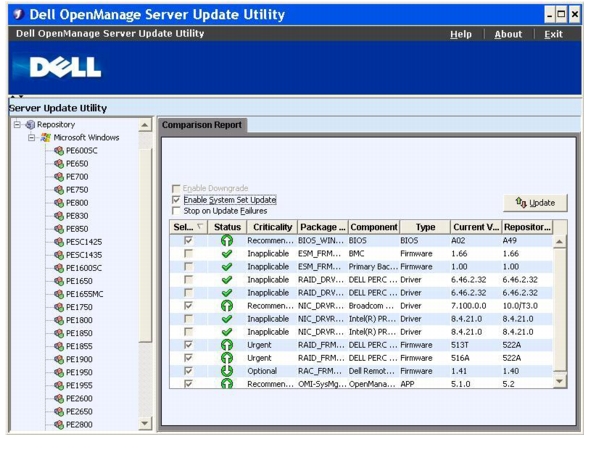
All the components that can be updated get selected in the Comparison Report.
|
|
NOTE: You cannot deselect individual components when you select the Enable System Set Update check box. |
If you click Yes, SUU displays the Update dialog box that shows the progress of the update.
The updates are reflected in the Comparison Report.

|
CAUTION: Do not click Update in SUU when the Comparison Report displays and an application, other than the SUU, is updating your system components. In such a scenario, restart SUU and then perform an update through SUU. |
SUU version 1.5 allows you to upgrade Dell OpenManage service packs. The procedure to upgrade Dell OpenManage service packs is the same as that to upgrade the hardware components.
To upgrade Dell OpenManage service packs, perform the following steps:
If you click Yes, SUU displays the Update dialog box that shows the progress of the upgrade as shown in Figure 1-13.
Figure 1-13. Dell OpenManage Upgrade Progress
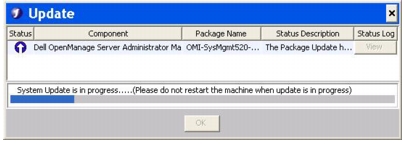
Dell OpenManage version 5.1 has been upgraded to Dell OpenManage version 5.2.
In SUU version 1.5, you can choose whether to continue or stop updates if the package that you have selected for an update encounters an update failure.
To continue or stop updates, perform the following steps:
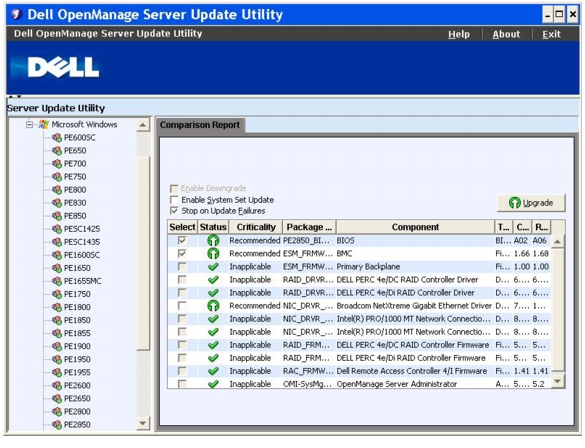
Figure 1-14. Stop on Update Failures Check Box Selected
|
|
NOTE: The Stop on Update Failures check box is enabled only if you have selected more than one component for an update. If you have selected only one component, the Stop on Update Failures check box is disabled. |
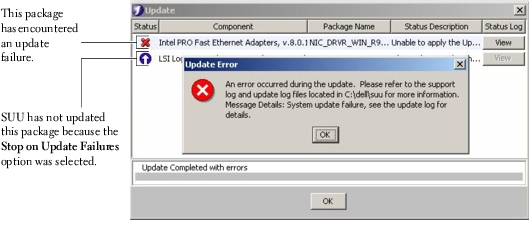
SUU starts the upgrade of the components selected for upgrade. If SUU encounters a failure while updating the first component, SUU does not continue updating the other components. It displays the failure icon ( ) in the Update dialog box indicating that the update has failed. SUU also displays the
 icon in the Update dialog box denoting that the other components selected for update have not been updated.
After the update process, SUU displays an Update Error dialog box stating an update error as shown in Figure 1-15.
Figure 1-15. Failure of Update
If you do not select the Stop on Update Failures check box, and SUU encounters an update failure, then SUU continues updating the other components as shown in Figure 1-16.
Figure 1-16. Continue on Update Progress
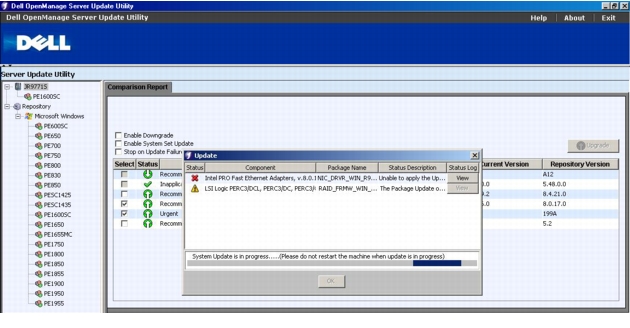
In Figure 1-16, the first component has not been updated because of an update failure. However, SUU has updated the second component because you did not select the Stop on Update Failures check box.
SUU then displays an Update dialog box that shows that the first component has not been updated but the second component has been updated. SUU also displays an Update Error dialog box that states and update failure as shown in Figure 1-17.
Figure 1-17. Continue on Update Error
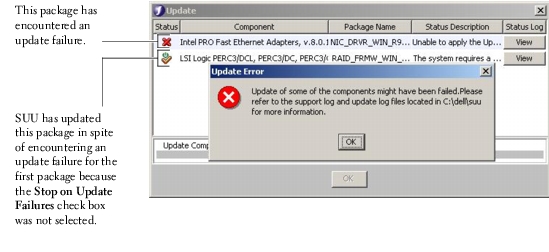
SUU has updated/stopped the updates of components depending on whether or not you selected the Stop on Update Failures check box.
In SUU, you can view help for any package or bundle displayed in the Repository.
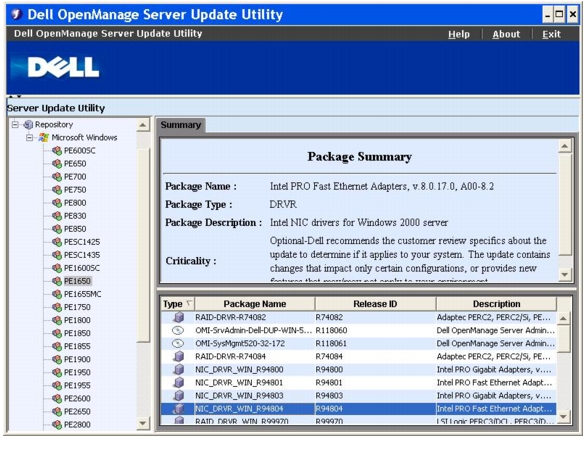
To view the package-level help, select any package in the Repository table. The help for that package is displayed in the Summary section as shown in Figure 1-18. You can also use the up arrow and down arrow keys to view help for a particular package.
Figure 1-18. Package-Level Help for the Selected Package
You can also view the bundle-level details.
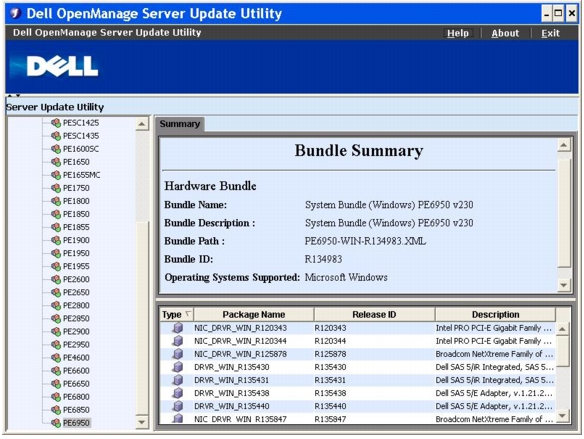
To view the bundle-level help, select any bundle under the Repository tree on the left side of the SUU GUI. SUU displays the information for the selected bundle in the Summary section and the packages specific to this bundle in the Repository table as shown in Figure 1-19.
Hardware packages are denoted by the  icon and software packages are denoted by the
 icon.
|
|
NOTE: You can use the <Tab> key to navigate through the Comparison Report table or the package/bundle-level details table and the <Ctrl><Tab> keys to navigate from the Comparison Report table or the package/bundle-level details table to the tree on the left-hand side of SUU. |
Figure 1-19. Bundle-Level Help
You can sort the columns in the Comparison Report and the Repository table by clicking the column names. SUU sorts the columns in the ascending or descending order. The  icon indicates that the column has been sorted in the descending order and the
 icon indicates that the column has been sorted in the ascending order.
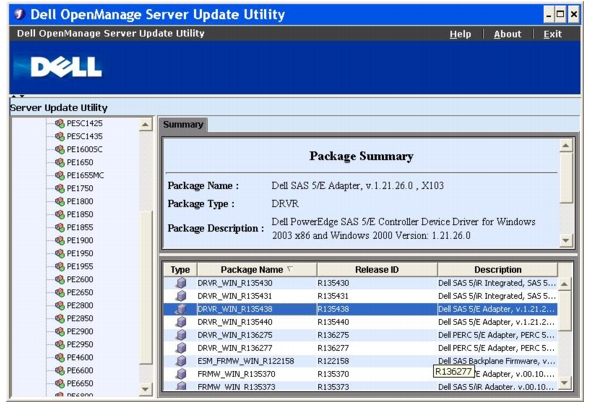
Figure 1-20 shows the Package Name column sorted in the ascending order.
Figure 1-20. Package Names Sorted
To browse through the Repository, perform the following steps:
|
|
NOTE: The Windows or Linux icon displays depending on your operating system. |
A list of supported systems is displayed.
Figure 1-21 shows an example of the Repository entry for PowerEdge 4600. All available components in the Repository for PowerEdge 4600 are displayed.
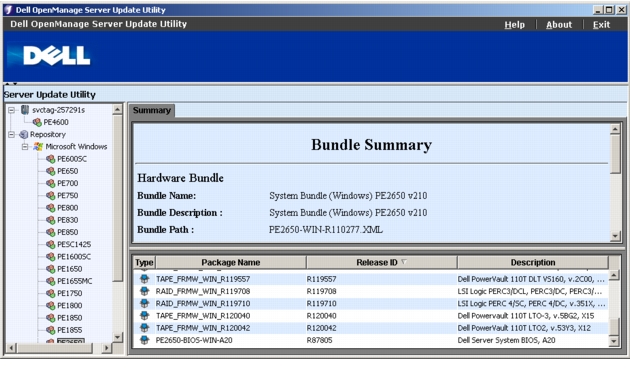
If you are using the Dell PowerEdge Server Update Utility CD for Windows, you can view the Repository for all the systems that support Windows. If you are using the Dell PowerEdge Server Update Utility CD for Linux, you can view the Repository for all Linux systems. Refer to DellSoftwareBundleReport.html in the Repository directory for details on the contents of the Repository.
SUU creates two event logs: update.log and support.log. The update log shows the status of each component updated. The support log contains trace and debug data and is only for use by Dell Support.
The default location for the SUU logs in Microsoft Windows is <%systemdrive%>:\dell\suu. The default location for the Linux logs is /var/log/dell/suu.
|
|
NOTE: You can use the suu -d command in the CLI to change the default location of the SUU logs. |
|
|
NOTE: The directory that you specify for the event logs must exist. SUU does not create the directory. |
To run SUU from the CLI, you must be in the Dell PowerEdge Server Update Utility CD root directory. If you are running SUU on a network share, copy the Dell PowerEdge Server Update Utility CD contents to a shared directory and run the CLI from the shared directory.
All CLI commands begin with the suu string followed by a space and then the short or long form of the command. If you type suu -? or suu -help or suu -h, the command line interface displays the syntax for SUU CLI commands:
Usage: suu [<command>] [-d | -directory <directory_name>]
Table 1-3 lists the SUU commands. To run a CLI command, open a command window and type the appropriate CLI command syntax at the command prompt.
Table 1-3. Server Update Utility CLI Commands
The default location for SUU event logs in Windows is <%systemdrive%>:\dell\suu. The default location for the logs in Linux is /var/log/dell/suu.
When you type suu with a command and a directory path, you can change the default location for logs to be stored during the balance of that session of SUU. The form of the command to change directory location for logs is:
suu <command> -directory <path>
For example, if you type suu -u -directory c:\tmp, SUU runs an update on the system and redirects logs to c:\tmp instead of c:\dell\suu.
To run the SUU comparison application, type suu -c. A welcome screen displays followed by a spinning bar that appears with the following message while the comparison is in progress:
| finding applicable system update set
When complete, the Comparison Report displays as in the following example:
========Comparison Results========
Component: BIOS
Component type: BIOS
current version: A11 < repository version A12
package name: PE1600SC-BIOS-WIN-Al2.exe
The Comparison Report provides a listing of the installed system components and the comparable SUU Repository components. The comparison of the version levels is indicated with the arithmetic symbols > (greater than), < (less than), and = (equal to). The report also lists the available Dell Update Package to update the component.
|
|
NOTE: The update command from the CLI can be used for both an upgrade and a downgrade. |
To update your system with the selected components, type suu -u. All components that are not up-to-date with the components in the Repository are upgraded. System components newer than the Repository version components are downgraded to the Repository level.
The -installIPMI command installs/updates the OpenIPMI driver on your Linux system. If SUU detects that updates need the OpenIPMI driver to be installed and you run commands such as suu -g, suu -c, suu -u, or suu -p, an error message displays asking you to install the required OpenIPMI driver and SUU exits. Run the suu -g -installIPMI command to launch the GUI and install/upgrade the OpenIPMI driver automatically.
If there is no OpenIPMI driver installed on your system, running the -installIPMI command installs the OpenIPMI driver contained on the Dell PowerEdge Server Update Utility CD.
If a lower version of the OpenIPMI driver is currently installed on your system, running the
-installIPMI command updates the lower version to that of the OpenIPMI driver contained on the Dell PowerEdge Server Update Utility CD.
If there is the same or higher version of OpenIPMI driver currently installed on your system, running the -installIPMI command does not affect the currently installed driver.
To view the current progress for your update, open another command shell and type suu -p.
A progress report similar to the following appears:
======update progress======
Package name : RAC_FRMW_WIN_R104824.EXE
Status : Update Successful
---------------------------------------
Package name: PE1750-BIOS-WIN-A11.exe
Status : Update is in progress
In SUU version 1.5, you can choose whether to continue or stop further updates, if the package that you have selected for an update encounters an update failure. To stop updates, type suu -u -s. If an update failure is encountered, SUU stops further package updates.
If you do not specify any parameter during the update, that is, if you type suu -u, SUU continues to update other packages even if it encounters an update failure.


