Back to Contents Page
Repository Management
Dell™ Repository Manager Version 1.1 User Guide
 Creating a New Repository
Importing an Existing Repository
Comparing Repositories
Saving the Repository
Editing or Deleting a Repository
Repository Manager allows you to create customized repositories that you can use to update Dell™ PowerEdge™ systems. A repository is a collection of components, primarily Dell Update Packages (DUPs), that are periodically modified to hold the most current updates for your systems. You can arrange these components in bundles to group related updates together. Every repository has a catalog.xml file that specifies the contents of a repository.
Using Repository Manager you can:
- Create a new custom repository
- Import an existing repository
- Compare available repositories
- Save the repository
You can deploy the repository through bootable ISO images, raw driver packs, deployment scripts, or Server Update Utilities (SUU).
Creating a New Repository
- Launch Repository Manager.
- In the Welcome dialog box, click Import a Repository. Alternatively,
click the Add link located at the top left corner of the Repository Manager
to add a repository.
- In the Create/Load Repository dialog box, select Create New Repository
and click Next.
- In the Name and Description dialog box, enter a name and description for
your repository and click Next.
- In the Select Source Repository dialog box:
- Select Local Repository to select an existing repository as a base repository and then add bundles to the base repository.
- Select Recent Repository to view the ten most recent repositories that were created or imported using Repository Manager. You can select one of these repositories as the base repository.
- Select Empty Repository to create an empty repository.
- Click Next.
- If you select Empty Repository, and in the Summary dialog box click
Finish, Repository Manager creates an empty repository. You can add
bundles and components to the new repository. For information on adding
bundles, see "Importing Bundles".
- If you select an existing repository as a base repository, in the Select Form
Factor dialog box, select the type of Dell systems that you want to include
in your repository and click Next. Dell systems can be classified into racks
(monolithic), towers (monolithic), and blades (modular) systems.
- Click Next.
- In the Select Operating System(s) dialog box, select the operating system
whose components you want to include in the repository. For example,
if you select Windows, all DUPs pertaining to the Windows operating
system are included in the repository.
Selecting Both includes DUPs pertaining to the Windows and Linux operating systems.
- Click Next.
- In the Select System Model(s) dialog box, select one of the following
options:
- Select Include All to include in your repository Dell Update Packages (DUPs) for all available systems based on the form factor you selected in step 5. For example, if you selected Tower as the form factor, selecting Include All includes DUPs of all the Dell tower systems in the repository.
- Select Select Model(s)to display all the available systems based on the form factor you selected in step 8. You can select individual or multiple systems as required from the list box. For example, if you select Tower as the form factor, selecting Select Model(s) displays all the Dell tower systems. You can then choose the tower systems whose DUPs you want to include in the repository.
- Click Next.
- In the Select Bundle(s) dialog box, select the bundles you want to include
in the repository.
A bundle is a collection of DUPs that contain information about related components to be updated for that system.
- Select ONLY include most recent and custom bundle(s) to include only the recently released and customized bundles in the repository.
- Select Select Bundle(s) to select all the bundles displayed.
- Click Next.
- In the Additional Component(s) dialog box, click Yes if you want your
repository to include additional components not included in the bundles
you selected. Click View Components for examples of additional
components.
- Click Next.
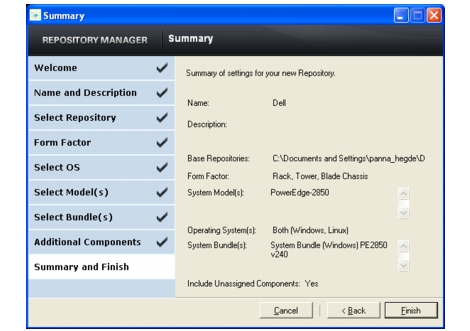
- The Summary dialog box displays the properties of the repository based on
your selections in the Repository Manager as shown in
Figure 3-1.
Figure 3-1. Summary dialog box
- Click Finish and specify a location to save your repository.
You can view the bundles and components in this repository from the Bundles and Components tabs.

|
NOTE: Ensure that the bundles and components you add to the repository belong to a specified criteria. Repository Manager does not restrict you from adding components that do not belong to the specified criteria into the repository. |
Importing an Existing Repository
- Launch Repository Manager.
- In the Welcome dialog box, click Import a Repository.
If you want to import a repository from ftp.dell.com, select Automatically
import ftp.dell.com. Repository Manager loads the entire repository from
ftp.dell.com. You can view the bundles and components in this repository
from the Bundles and Components tabs respectively.
- In the Create/Load Repository dialog box, select Load Existing
Repository and click Next.
- In the Select Source Repository dialog box:
- Select ftp.dell.com if you want to import a repository from ftp.dell.com.
|
|
NOTE: You cannot edit bundles and components contained in the repository stored on ftp.dell.com. Therefore, all the buttons on the Bundles and Components screens are disabled if you are viewing the bundles and components from ftp.dell.com. |
- Select Local Repository if you want to import a repository stored on your system. Click
Browse to specify the location of the local repository.
- Select Recent Repositories to view the ten most recent repositories that you created or imported using Repository Manager.
- Click Next.
- In the Summary dialog box, click Finish to complete the import of the
repository.
You can view the bundles and components in this repository from the Bundles and Components tabs.
Comparing Repositories
You can compare the repository you created or imported (the base repository), with other available repositories (comparison repositories), and obtain the list of differences between the two repositories.
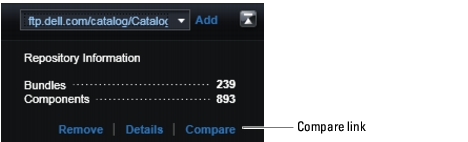
To compare repositories, click Compare on the top right hand corner of Repository Manager. You can also click the Compare button in the Summary dialog box.
|
|
NOTE: You must create or import at least two repositories to use the Compare feature. |
Figure 3-2. Compare Feature
The table below lists the options in the Compare Repositories dialog box:
Table 3-1. Compare Repositories dialog box - Options
|
Field
|
Description
|
|---|
Base Repository
| Select the initial repository that you want to use for comparison from the displayed list of available repositories.
|
Comparison Repository
| Select the repository with which you want to compare your base repository. Displays a list of the available repositories.
|
Newer Versions
| Select this check box to view newer versions of the same components in the comparison repository.
|
Changed Files
| Select this check box to view any component files that have changed in the comparison repository.
|
Updates to Remove
| Select this check box to view any updates removed from comparison repository but present in the base repository.
|
Updates to Add
| Select this check box to view any updates present in the comparison repository but not the base repository.
|
Comparison Report
| Click this button to save and view the comparison report in HTML.
|
The comparison report displays newer versions, added releases, and changed releases available in the comparison repository. You can update your base repository with the components displayed in the comparison report:
- On the Newer Versions tab, click Update to update the base repository with newer versions of the components.
- On the Changed Files tab, click Add Copy to add a copy of a component from the comparison repository to the base repository.
- On the Updates to Remove tab, click Remove to remove a component from the base repository.
- On the Updates to Add tab, click Add to add a component from the comparison repository to the base repository.
Saving the Repository
- Select the repository you created or imported.
- Click the Save icon.
- Save the catalog.xml file to the desired location.
Editing or Deleting a Repository
You can only edit the name and description of a selected repository.
- Select the repository you want to edit or delete.
- To edit a repository, click Details link below the Repository drop-down list.
- In the Repository Details dialog box, edit the name or description and
click Apply Changes.
- To delete a repository from Repository Manager, select the repository you
want to delete, and click the Remove link below the Repository drop-down
list.
- In the Save Confirmation dialog box, click Yes to save the repository in
your system before deleting it. If you click Yes, Repository Manager saves
the repository in your system but does not display it in the drop-down list.
Click No to delete the repository without saving it.
Back to Contents Page