Back to Contents Page
Bundles and Components Management
Dell™ Repository Manager Version 1.1 User Guide
 Importing Bundles
Creating a Custom Bundle
Cloning Bundles
Comparing Bundles
Exporting Bundles
Exporting as a Functional SUU
Adding and Removing Components
Exporting Components
A bundle is a collection of Dell™ Update Packages (DUPs), also called components, that group together updates related to a certain platform, for example, PowerEdge™ R410 and operating system, for example, Microsoft® Windows® 2003.
You can use Dell Repository Manager to:
- Create and customize bundles
- Clone existing bundles
- Compare bundles
- Export bundles to external repositories or deploy them to applicable systems in the form of Linux ISOs, deployment packs, INF files, or a fully functional Server Update Utility (SUU).
Importing Bundles
- Create or import a repository.
- Click the Bundles tab.
- Click Add.
- In the Import Bundle(s) dialog box, click Next.
- In the Import Options dialog box, select Import bundle(s) from an
existing repository if you want to import bundles already present in an
existing repository. If you want to create a custom bundle, select Manually
create a bundle.
For more information on the Manually create a bundle option, see "Creating a Custom Bundle".
- Click Next.
- In the Select Source Repository dialog box, select the repository that
contains the bundles you want to import. The repository can be on
ftp.dell.com, or a repository saved in your system, or a recently used
repository displayed in the Recent Repositories list.
- Click Next.
- In the Select Form Factor dialog box, select the form factor of the systems
associated with the bundle you want to import. For example, if you want to
import the bundle for a tower system, select Tower.
- Click Next.
- In the Select Operating System(s) dialog box, select Windows or Linux to
include the DUPs applicable to Windows or Linux respectively. You can
select Both to include DUPs applicable for both the operating systems.
- Click Next.
- In the Select System Model(s) dialog box, select Include All to include
DUPs for all available systems. Select Select Model(s) to include DUPs
only for the systems you select from the displayed list.
- Click Next.
- In the Select Bundle(s) dialog box, select the bundles you want to include
in the repository. Select ONLY include most recent and custom bundle(s)
to include manually created bundles and the most recently used bundles.
- Click Next.
- The Import Summary dialog box displays a list of bundles based on the
criteria you specified. Click Finish to import the bundles.
Creating a Custom Bundle
You can create a custom bundle, and then import components to that bundle.
- Load the repository that you want the custom bundle to belong to, or
create a new repository.
- Click the Bundles tab.
- Click Add.
- In the Import Bundle(s) dialog box, click Next.
- In the Import Options dialog box, click Manually create a bundle.
- Click Next.
- In the Name and Version dialog box, enter a name and version for your
bundle. Select the operating system this bundle is applicable to.
- Click Next.
- In the Select Operating System dialog box, select the operating system(s)
required.
- Click Next.
- In the Select Platforms dialog box, select the required platform(s)
required.
- Click Next.
The Import Summary dialog box displays the properties of the custom bundle you created such as the Bundle Name, Bundle Type, OS Type, Associated Operating Systems, and Associated Platforms.
- Click Finish to complete the creation of the custom bundle.
The custom bundle is added under the list of bundles on the Bundles tab. You can now export components to the custom bundle. For information on exporting components, see "Exporting Components".

|
NOTE: You cannot add components to a bundle if the components are not compatible with the bundle's associated Operating System or Platform. |
Cloning Bundles
You can create an exact copy of an existing bundle, and specify a new name and version for the copy.
- Click the Bundles tab.
- Select a bundle you want to copy from the list of displayed bundles, and
click Clone.
- In the Clone a Bundle dialog box, the Bundle Name field displays the
bundle that you selected to be copied or cloned.
- In the New Name field, enter a name for the cloned bundle.
- In the Version field, enter a version number for the cloned bundle.
- Click OK.
Comparing Bundles
You can compare bundles, view and compare the DUPs that have changed in the bundles you selected.
- On the Bundles tab select the bundle you want to compare. This is the
base bundle
- Click Compare.
- In the Compare Bundles dialog box, select a repository that contains the
bundle with which you want to compare the base bundle, from the
Repository drop-down list.
- The Bundles list box displays the bundles contained in the repository you
selected. Select the bundles you want to compare with the base bundle.
|
|
NOTE: The Bundles list box displays bundles from the selected repository based on the base bundle. If you select a Linux bundle as the base bundle, then Linux bundles are displayed. If you select a Windows bundle as the base bundle, then Windows bundles are displayed. |
- Select Newer Versions to view newer versions of the components in the
bundles you selected.
- Select Changed Files to view component files that have changed in the
selected bundles.
- Select Updates to Add to view updates that are present in the comparison
bundle but not in the base bundle.
- Select Updates to Remove to view updates that are present in the base
bundle but not in the comparison bundle.
- Click Compare to view the comparison report for the selected bundles
based on the criteria you specified.
- You can also click Comparison Report to save the report as a HTML file
and view it in a Web browser.
Exporting Bundles
You can export a bundle in the form of ISO or INF files or light-weight deployment packs, or SUU, and use it to update applicable systems. You can export a bundle to an existing repository.
- Click the Bundles tab.
- Select the bundles you want to export from the list of displayed bundles
and click Export.
- In the Export Bundle(s) dialog box, click Next.
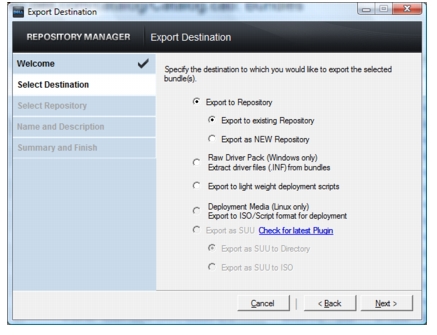
- In the Export Destination dialog box, select one of the following:
- Export to Repository to export the bundles to a repository. You can choose to export to an existing repository or create a new repository. If you select the Export as NEW Repository option, Repository Manager creates a repository containing only the bundles you selected.
- Raw Driver Pack to export the bundles as INF files. You can use these INF files to update applicable systems. This option is applicable to only those bundles that contain driver updates for the supported Microsoft Windows operating system.
|
|
NOTE: Bundles containing Linux components are skipped during the export process. |
For every exported bundle(s), a folder is created with the name of the bundle(s). Navigate to the required bundle folder and run .bat file to apply the drivers on the system.
- Deployment Media to update systems irrespective of the operating system installed on them. It can be used to update systems that do not have an operating system installed.
The Deployment Media option exports the bundles as ISO images. You can burn these ISO images to a CD, and boot the CD on the systems that you want to update with the latest bundles. This option is available for deployment only if you select Linux custom bundles.
This ISO image uses DTK Linux Kernel to execute the DUPs and update the system.
If the deployment media(ISO) is created using multiple base lines(bundles), all the base lines will be displayed on the console when you boot the server through the media. In order to start the execution, enter the number corresponding to the required baseline and press Enter. For example, if M710 is the second in the list, press 2 and apply the bundle.
If the deployment media is created using a single base line (bundle), execution automatically starts when you boot the server through the media.
When a deployment folder is created, a new Readme.html is created with the bundles in the location you provided. The readme file describes the contents of the deployment kit such as platform included, operating system (OS), and information about components.
|
|
NOTE: If you select Windows bundles, they will be skipped. |
- Export to light weight deployment scripts to export the bundles in the form of deployment scripts. Select a location to save these bundles. Repository Manager saves the scripts for bundles pertaining to Microsoft Windows in the .bat format and Linux in the .sh format. You can then run the .bat and .sh scripts on Microsoft Windows and Linux systems respectively.
When a deployment folder is created, a new Readme.html is added. The Readme file describes what the deployment kit contains, like supported platforms, OS, and information about components.
|
|
NOTE: You can edit these scripts to add or remove components of your choice. |
- Export as SUU to export a
selected Dell recommended or custom bundle as a fully functional SUU. For more information, see "Exporting as a Functional SUU."
- Click Finish to complete the export.
To export bundles on a shared network using deployment script, raw driver pack, deployment media, and SUU, map the shared network prior to the export, and during the export point the mapped shared network as the destination location.
Exporting as a Functional SUU
You can export a selected Dell recommended or a custom bundle as a fully functional SUU.
- Load or import a repository.
- Click the Bundles tab.
- Select the bundles you want to export from the list of displayed bundles,
and click Export.
- In the Export Bundle(s) dialog box, click Next.
- In the Export Destination dialog box, click Check for latest Plugin.
This checks for availability of the SUU plugin in ftp.dell.com.
|
|
NOTE: For the first time, Export as SUU radio button is disabled. The option is enabled after you download the plugin, or there is an existing plugin in your local system. |
- While the check for SUU plugin is in progress,
Looking for Plugin is displayed.
- If there is a plugin, Plugin Update Available is displayed.
- Click on Plugin Update Available.
- In the Update SUU Creation dialog box, click
OK to download the plugin.
- If the latest plugin is already downloaded,
Latest Plugin Installed is displayed.
|
|
NOTE: Ensure the system connects to the internet and ftp.dell.com is reachable. If ftp.dell.com is not reachable, click Check for latest Plugin to retry. |
- In the Export as SUU option, select Export as SUU to Directory or Export
as SUU to ISO.
Export as SUU to Directory creates an SUU pack in the provided directory. The Export as SUU to ISO creates an ISO image of the fully functional SUU pack.
For more information on Usage of SUU on Windows and Linux servers, refer to Dell™ OpenManage™ Server Update Utility User's Guide at support.dell.com
Figure 4-1.
Export Destination
Adding and Removing Components
You can add components from other bundles and repositories to the bundle or repository you select. You can remove components from a bundle or a repository.
- Select the repository to which you want to add the component.
- On the Components tab, click Add.
- In the Select DUP File to Add dialog box, select the component that you
want to add. You can browse and search for the component from all the
repositories available on your system.
- Repository Manager adds the component to the repository and the
DUP File(s) Imported message is displayed.
- To remove a component, on the Components tab select the component
you want to remove, and click Remove.
Repository Manager removes the component from the repository.
|
|
NOTE: You can remove a component from a bundle in a similar way. The component removed from the bundle will be available in the repository. |
Exporting Components
- Select the repository to which you want to export the component.
- On the Components tab, select the component(s) to export.
- Click Export.
- In the Export Component(s) dialog box, click Next.
- In the Export Destination dialog box, select any of the following:
- Export to existing Repository — to export components to an existing repository. Select the repository to export the components. Click the Add button to select repositories that are not displayed under Repositories.
- Export as NEW Repository — to export components to a new repository that you create. In the Name and Description dialog box, enter the name and description of the components. For information on creating a repository, see "Creating a New Repository".
- Export to existing Bundle — to export components to an existing bundle in the same repository. Select a specific bundle to which you can add the components.
- Export as NEW Bundle — to export components to a bundle in the same repository. In the Name and Version dialog box, enter the name, version, and OS type of your bundle, and click Next. In the Select Operating System dialog box, select the required operating system(s). In the Select Platforms dialog box, select the desired platform(s).
- Click Finish to complete the export.
|
|
NOTE: To add a component to a bundle, first add the component to the repository the bundle belongs to, and then export it to the bundle. |
Back to Contents Page