 Administration > CMDB Administration > IT Universe Manager Administration > Working with CIs in IT Universe Manager > Creating a New CI > Using the New CI Wizard
Using the New CI Wizard
The New CI Wizard is used to define both non-related CIs (described in Creating a Non-Related CI) and related CIs (described in Creating a Related CI). The wizard content is dynamically updated during the definition process, according to your selections.
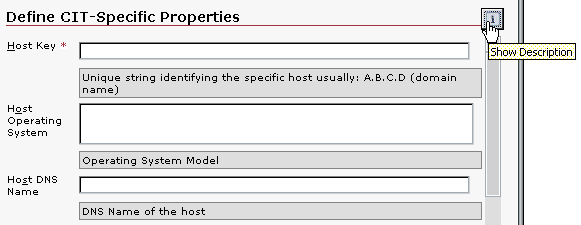
Some of the wizard pages contain a Show Description
 button in the top-right corner of the page. Click this button to display additional information for the CI properties, for example, a description of the property, or an alternative name used for the property. Click the button again to hide the descriptions.
To create a new CI:
- Open the Admin > CMDB > IT Universe Manager tab.
- In View Explorer (left pane), access the view in which you want to create the CI.
- Click the appropriate button/link as follows:
- If you want to create a CI that is not related to an existing CI, select the view name in the view tree and click Create New CIs.

- If you want to create a CI that will be the parent or child of an existing CI, select the existing CI in the view tree and click New Related CI.

- Select the CI type for the new CI. The CI Type property is context sensitive, permitting you to select only the CITs that are appropriate for the CI or view under which you are creating the new CI. You can select the CIT:
- from the CI Type dropdown list, which contains an abbreviated list of the most commonly used CITs, as well as CITs that you have previously used (as appropriate for the context).
- from the Select Configuration Item Type window, opened by clicking the button
 beside the CI Type box. The Select Configuration Item Type window contains a list of all available CITs that are appropriate for the context. You can toggle the display between CI Types Tree (which organizes the CITs by category) and CI Types Table (which displays an alphabetical list of all available CITs).
- Define the other general properties for the CI. Mandatory properties are marked with an asterisk. For information on the properties, see General Properties for CIs.
- Some CIs, for example Group, have a default context menu defined automatically. You can change the context menu, or define new ones, by clicking Edit Menu List. For details, see Editing the Menu List.
- CIs added to instance views generally include the Include Related CIs option:
- If the Include Related CIs check box is selected, the CI is set to include all child CIs, and all CIs in the subtree for the CI are included in the view.
- If the check box is not selected, the CI is set to exclude all child CIs, and the child CIs are not automatically displayed in the view. However, the view might include children for the CI (for example, for relationships that are created within the current view).
- If you are creating a non-related CI that does not require CIT-specific properties, then the Finish button is enabled. Click it and skip to step 8.
- If you are creating a CI that requires CIT-specific properties, the Next button is enabled. Click the button and continue with the next step.
- If you are creating a related CI that does not require CIT-specific properties, then the Next and Finish buttons are enabled. Continue according to the option you require:
- Some CITs require the definition of properties specific to that CIT category, in which case the wizard displays the Define CIT-Specific Properties page (for information, see CIT-Specific Properties).
- If you are defining a related CI, then the wizard displays the Define Configuration Item Relationship page. This page enables you to define the relationship between the new CI and the selected CI in the view, and the properties for the relationship. For more information on relationships, see Working with Relationships.
- CI 1 - Displays the name of the CI on the first side of the relationship. This is the CI that you selected in the view.
- CI 2 - Displays the name of the CI on the second side of the relationship. This is then new CI that you are creating.
- Relationship Type - Enables you to define the type of relationship that will be created between the two CIs. For most relationships, only the Depends On option is available. Select an option from the list.
- The new CI and relationship are created in the CMDB and the created CI is added at the specified point in the view tree, if the created CI is appropriate for the current view. If you are working in a pattern view, and the CI or relationship are not appropriate for the TQL definition for the view, then the Summary page is displayed, stating that the CI was not added to the view.

Tip: You can also select the required option from the right-click menu for a CI.
The New CI Wizard opens at the Define General Properties page, where you select the CIT category for the new CI, and define the properties associated with every CI, such as name, geographical location, and appropriate context menu.
For pattern views, you have the option of toggling between the Display only CITs that match the current view list, and the Display all possible CITs list, where you can view all available CITs (not only the CITs that match the context). Select the appropriate radio button for the list you require. When you define a CI that does not match the context, it is created in the CMDB, but not added to the current view.
For more information on the available CITs, see Configuration Item Types.
Note the following:
The Include Related CIs option may be non-editable. For more information on this option, see Include Child CIs.
Proceed as follows:
Mandatory properties are marked with an asterisk.
Enter the required information in the property fields and click Next to define relationship properties, or click Finish and skip to step 8.
The Relationship Definition area of the page contains the following properties:
The Relationship Properties area of the page contains properties that are applied to the relationship, such as the Must and Weight attributes. For information on the properties, see Relationship Property Descriptions.
Enter the required information and click Finish.
Tip: If the CI does not appear in the view, try refreshing the view using the Refresh
 button in View Explorer.