 Administration > Application Administration > Repositories Administration > KPIs Repository > Specifying the KPI Details
Specifying the KPI Details
In the KPI Details dialog box, you can modify existing detailed information for the KPI. You can also modify existing information or enter new information for the KPI parameters.
Cloning a KPI creates a new KPI with a new ID number.
This section includes the following topics:
Specifying the KPI Details
You can modify existing detailed information for the KPI.
To specify KPI details:
- Access the KPI Details dialog box.
- Enter the displayed name for the KPI in the Display Label box.
- Select the order in which the KPIs are displayed in Dashboard or Service Level Management in the Display Order list.
- Select the KPI position in the Calculation Order list.
- Enter the highest KPI status from which you can add an acknowledgment note in the Dashboard or Service Level Management application in the Acknowledgement Level box.
- Select the type of user in the Applicable for User Role list. You can define two versions of a single Dashboard KPIs for two different user types (modes): Operations and Business, where each KPI version is geared towards the particular viewing requirements of one of the user types - for details, see KPIs for User Modes. Select Both if you want to have one version of the KPI.
- Select the group rule to be used for the next level up in the hierarchy in the Default Group Rule list.
- Select how you want the KPI to be presented in the Dashboard or Service Level Management application—ICON, TEXT, PNR_BAR, BAR or GROUPBAR—in the Type list.
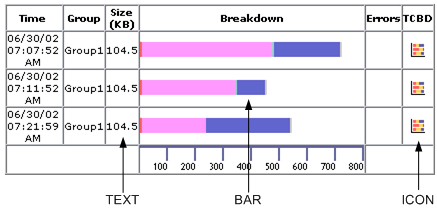
- The source of the KPI status is displayed in the Status box. It is usually Status.
- Select the formatting method you want to use for this KPI in the Available Formatting Methods list - for details, see Formatting Methods.
- The formatting method that is invoked on the valueSource is displayed in the Formatting Method box. This field can remain blank if it is not required. If you need to create a new method, contact Mercury Customer Support.
- The source of the KPI value is displayed in the Value box. It is usually Value.
- Enter the row value prefix in the Value Prefix box. This can remain blank if it is not required.
- Enter the row value postfix in the Value Postfix box. This can remain blank if it is not required.
- Enter the type of unit applicable to the rule results displayed in the KPI, in the Units box - for more details about the available units, see Units of Measurement for Objectives.
- In The KPI is critical list, select the trend for the KPI - for details on trend, see Trend. Select:
- values are smaller - when the values are small the KPI is critical
- no different - when the values are not different the KPI is critical
- values are bigger - when the values are large the KPI is critical
- Add rules or remove existing rules from the Applicable Rules list. Applicable Rules lists the rules (types of calculations) that can be performed on the KPI.
- Add sections or remove existing sections from the Applicable Sections list. Applicable Sections lists the sections (applications and sub-applications) in which the KPI can be displayed. For the KPI to be displayed, you must select at least one section.
- You can then modify the existing parameters or add new parameters to the KPI - for details, see Specifying the KPI's Parameter Details.
That number represents the position of the KPI in the ordered list used by Dashboard or Service Level Management when it calculates the topology. Dashboard or Service Level Management calculates the higher priority KPIs first, and then the lower priority KPIs.
If you select Operations and Business, it is recommended to modify the KPI's name to reflect the type of user role. For example, rename OT Impact: OT Impact - Operations.
This list displays all the available group rules for the applicable rule you selected in the Applicable Rules list.
When a KPI is defined for a CI, it is usually added to a parent CI. The parent item uses the group rule to calculate the KPI status. For a list of the group rules, see Dashboard Business Rules Details.
If you select the GROUPBAR type for the Transactions KPI and one or more of the CI's children has the Business Process Step type, then the Transactions KPI is displayed as a GROUPBAR in the Console tab.
If you select GROUPBAR for the Locations KPI and one or more of the CI's children has the Locations type, then the Locations KPI is displayed as a GROUPBAR in the Console tab. For example:
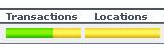
For more details about the PNR_BAR representation, see Attaching a PNR KPI to a CI.
The value of the Status box represents the key in the KPI results status object. Changing the value of Status is necessary if you create a new rule with a key that is not Status; in such a case, enter the key of the new rule in the Status box. To create a new rule with a different key, contact Mercury Customer Support.
The value of the Status box represents the key in the KPI results value object. If you enter another string in the Value box, you must create a rule whose key is the Value value. If you need to create a new rule, contact Mercury Customer Support.
For example, to indicate that the value of the KPI is in dollars, enter $ in the Value Postfix box.
Note: All the fields listed above are connected to the calculation performed by the selected Applicable Rules.
One of the rules in the list of applicable rules is the default rule of the KPI. You can change the default rule of the KPI to one of the other rules selected in the Applicable Rules list. For example, the applicable rules of the OT Impact KPI are: Sum of Values rule and Impact Over Time rule. The default rule is Sum of Values.
Note: Make sure that you press the Ctrl button when you select the rules. If you do not press the Ctrl button, all the pre-selected rules are disabled when you click the rule you want to add to the applicable rules.
For details on the rule applicable for a specific KPI, see Dashboard KPIs Details. The rules included here define the options that will be available in the View Builder when selecting the rule to assign to a KPI.
Note: You must select a rule in the Applicable Rules list to make it available to the KPI.
The available applicable sections are:
Specifying the KPI's Parameter Details
In the Parameters Details dialog box, you can modify existing detailed information or enter new information about the KPI's parameter.
The pre-defined default status parameters are the same for each KPI:
critical - (red) indicates that the status falls within the Critical objective level- for details, see KPI Objectives
downtime - stopped or downtime (gray with green outline) status. The corresponding profile/group/monitor is currently disabled
info/OK - (green) indicates that the status falls within the OK objective level - for details, see KPI Objectives
major - (orange) indicates that the status falls within the Major objective level - for details, see KPI Objectives
minor - (yellow) indicates that the status falls within the Minor objective level - for details, see KPI Objectives
stop - stopped or downtime (gray with green outline) status. The corresponding profile/group/monitor is currently disabled
none - uninitialized or No Data (gray) status.
warning - warning (yellow) status
The values of the From, To, Color, and Icon parameters might be different depending on the KPI. For example:
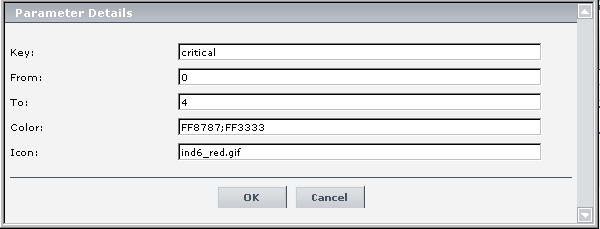
To specify the KPI's parameter details:
- In the KPI Details dialog box, in the KPI Parameters area, click the New or Edit button to open the Parameter Details dialog box.
- Enter the name of the KPI parameter in the Key box.
- Enter the appropriate values in the From/To boxes.
- Enter a color (HTML color code, RGB, or hexadecimal format) in the Color box. The first number represents the color of the border of the KPI tooltip. The second number represents the color of the header of the KPI tooltip - for details, see Color and Icons.
- Enter the path to a status icon in the Icon box.
- Click OK to save the new KPI details and close the KPI Details dialog box.
When the value of a KPI is in the range indicated by the From and To boxes, the tooltip for the KPI is assigned the color specified in the Color box and the KPI is assigned the status icon specified in the Icon box.
The icon you specify is assigned to the KPI when the KPI's value is within the range specified in the From/To fields - for details, see Color and Icons.
Note: For a list of KPI parameters and their default values, see the description of each KPI in Dashboard KPIs Details.
Formatting Methods
The formatting methods that are available are:
Trend
Service Level Management (SLM) KPIs are assigned a positive trend (the higher the better or the lower the better).
For example:
- the Availability KPI is given a positive trend. This means that it becomes critical when its value is small because it means that the page whose availability is being measured is not available most of the time. The Availability KPI performance is best when its value is large.
- the Outage Duration KPI is given a negative trend. This means that its performance is best when its value is small.
Color and Icons
You can specify the border and header color of a KPI tooltip for each one of the KPI's parameters. The colors specified in the Color box, are assigned to the KPI tooltip when the KPI value is within the range specified in the From/To boxes - for details, see Specifying the KPI's Parameter Details.
The syntax is: <border_color>;<header_color>
The colors should be separated by semi-colons.
For example: when the Availability KPI has the OK status, the tooltip would display the following colors 66CC00;339900:
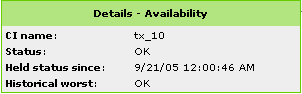
A hex triplet is a six-digit, three-byte hexadecimal number used to represent colors. The bytes represent the red, green and blue components of the color in respective order. One byte represents a number in the range 00 to FF. The hex triplet is formed by concatenating three bytes in hexadecimal notation.
For example, consider the color where the red/green/blue values are hexadecimal numbers: red=24, green=68, blue=A0 (a greyish-blue color). To obtain the hex triplet, simply write the three hex bytes together without spaces, thus: 2468A0. If a byte is less than 16 (decimal) or 10 (hex) it must be represented with a leading zero to keep the number of digits in the triplet equal to six.
You can also specify the icon that is assigned to the KPI when the KPI value is within the range specified in the From/To fields. You must enter the path to a status icon in the Icon box - for details, see Specifying the KPI's Parameter Details.